

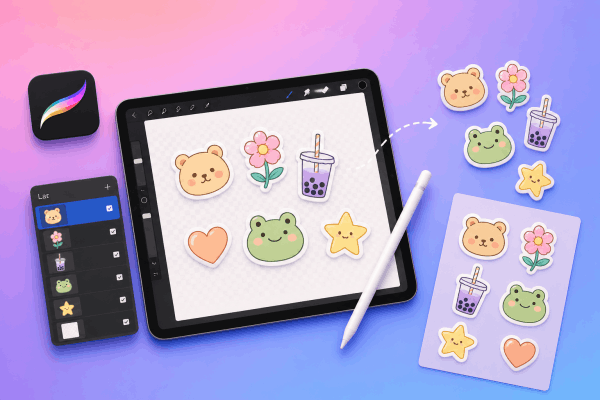
Learn how to create digital stickers on Procreate with our step-by-step guide. Master outlines, transparency, and top tips for digital planners.
If you are anything like me, your iPad isn’t just a tablet, it’s a creative escape, a digital bullet journal, and a productivity powerhouse all rolled into one. One of the absolute best parts of diving into the digital planning world is customizing your layout. And what better way to do that than with your own custom artwork?
If you have ever wanted to customize your digital planner or sell your own designs online, learning how to make your own custom graphics is a total game-changer. In this step-by-step guide, we will break down how to create digital stickers on Procreate using practical methods that experienced digital artists actually use every day.
No overly complex jargon here, just a straightforward, actionable walkthrough to get your creative juices flowing.
CONTENTS:
How to create digital stickers on Procreate: A step-by-step guide
Creating digital assets doesn’t have to be intimidating. By mastering a few key settings, like canvas resolution, layering, and transparency, you will be exporting beautiful, crisp designs in no time. Let’s grab your Apple Pencil and dive right in!
Step 1: Set up your canvas for digital success
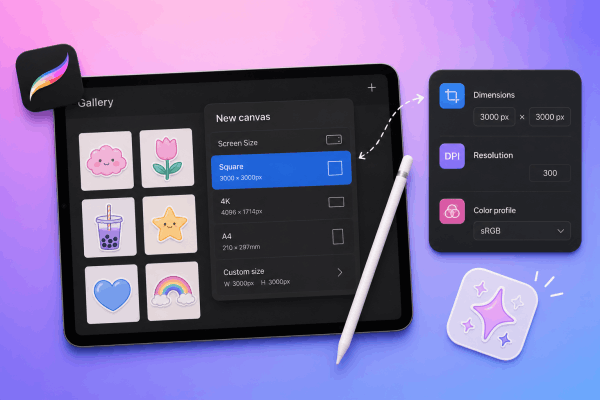
Before you draw your first line, you need to set up the right foundation. Open Procreate, tap the + icon in the top right corner, and create a custom canvas.
-
Dimensions: A square canvas like 2000 x 2000 pixels or 3000 x 3000 pixels works beautifully. It gives you plenty of detail without lagging your iPad.
-
Resolution: Always set your DPI to 300. Even though these are digital stickers, keeping the resolution high ensures they look incredibly crisp on high-definition retina screens—and gives you the flexibility to print them down the road if you want to!
-
Color Profile: Stick with sRGB. This profile is optimized for screens, ensuring the vibrant neon pink or pastel blue you choose looks exactly the same in your digital planner app.
Step 2: Sketch and color your artwork
Now for the fun part! On your first layer, rough out your concept.
-
Brushes: For a clean sticker look, use the Monoline brush (found under the Calligraphy set) for your final line art. It provides smooth, consistent lines that don’t get pixelated or messy when filled.
-
Coloring: Create a new layer underneath your sketch for your colors. Pro tip: make sure your outlines are completely closed so you can simply drag and drop your colors right into the shapes to fill them instantly.

Step 3: Add the classic white sticker outline
That white border is what makes a sticker truly look like a sticker. The absolute easiest, most foolproof way to do this without manual, shaky tracing involves using the Selection Tool.
-
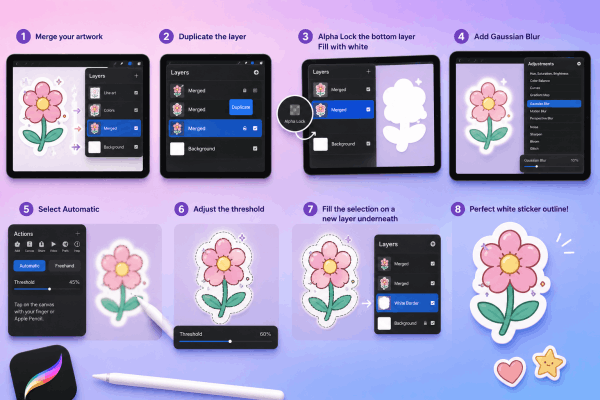
Merge your artwork: Once your drawing is finished, merge all your color and line layers into a single layer.
-
Duplicate the layer: Swipe left on your artwork layer and hit Duplicate.
-
Alpha Lock the bottom layer: Tap the bottom duplicate layer, select Alpha Lock, and fill the entire layer with pure white. Turn Alpha Lock off afterward.
-
Add Gaussian Blur: With that bottom white layer selected, tap the Adjustments menu (the magic wand icon) and select Gaussian Blur. Slide your Apple Pencil to the right until you get a soft, even blur around your shape (around 8% to 12% works best depending on canvas size).
-
Harden the edges: Tap the Selection Tool (the “S” ribbon icon), choose Automatic, and tap inside the blurred white area. Adjust the threshold by sliding your pencil until it cleanly wraps the blur.
-
Fill the selection: Create a new layer directly underneath, select white, and fill it. Boom—you have a perfectly uniform, smooth white border.
Step 4: Hide the background and export as a PNG
For your artwork to work seamlessly on the colored pages of a digital planner, it needs a transparent background.
-
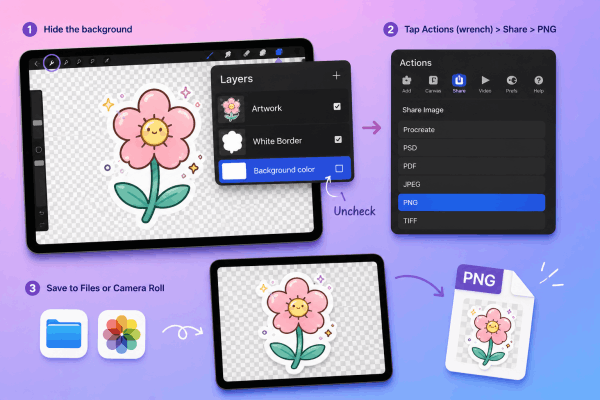
Open your Layers panel and uncheck the box next to Background color. Your canvas will now show a gray grid pattern.
-
Tap the Actions menu (the wrench icon), select Share, and choose PNG.
-
Save the file directly to your iPad’s Files app or your camera roll.
Real-world tips from experienced digital artists
When you look at actual community discussions from veteran iPad creators, you quickly realize that the textbook method isn’t always the fastest. Here are a few practical tips to speed up your workflow:
-
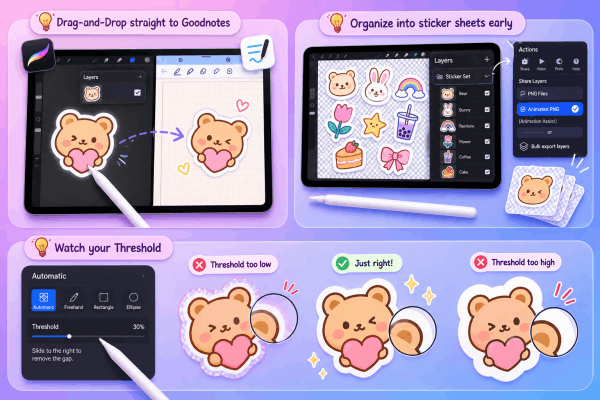
The Drag-and-Drop Goodnotes Trick: If you are making graphics strictly for personal use in your favorite note-taking app, you don’t even have to export them to your files first. You can open Procreate and your digital planner side-by-side in Split View on your iPad. Simply press and hold the layer containing your finished design, drag it across the screen, and drop it straight onto your planner page. It saves a ton of storage space and time.
-
Organize into Sticker Sheets early: Don’t work out of 50 different Procreate files. Keep your canvas large, and create a single file for a cohesive collection. Use layers and groups to organize individual pieces. When it’s time to export, you can use the Animation Assist feature or bulk export layers to save them all as individual transparent PNGs with a single tap.
-
Watch your Threshold: When using the color drop or automatic selection tool to make your white outlines, if you see a weird halo or pixelated gap between your color and your border, your selection threshold is too low. Keep your stylus held down on the screen and slide it to the right to increase the threshold until the gap disappears.
Procreate sticker design checklist
Before you hit export, run through this quick quality-control checklist to make sure your assets function perfectly:
-
[ ] Is the background layer hidden? (Crucial for transparency)
-
[ ] Are there stray pixels? (Turn on a bright red background temporarily to see if you left any accidental paint smudges outside the border)
-
[ ] Is the file saved as a PNG? (JPEGs do not support transparent backgrounds)
-
[ ] Is the text legible? (If your artwork includes text, scale it down on your screen to make sure it’s readable at a small size)
You may need this:
- Procreate Canvas Size Too Small Error: Fix Your Layer Limits Now
- How to Fix Procreate Lag After Update: Practical Solutions for iPad Artists
Frequently asked questions
Why do my digital stickers look blurry when I import them into my planner?
This usually happens if your initial canvas size was too small (e.g., under 1000 pixels) or your DPI was set below 150. Always start with at least a 2000 x 2000 pixel canvas at 300 DPI to guarantee sharp, high-res assets.
Can I sell digital stickers made in Procreate?
Yes! You can absolutely sell your creations on platforms like Etsy or your own website. Just ensure that any brushes, fonts, or stamps you use to create them have a commercial use license. Using Procreate’s default brushes for commercial work is perfectly fine!
What is the best app to use my digital stickers in?
Popular note-taking and digital planning apps like Goodnotes, Notability, Xodo, and CollaNote are excellent for using custom PNG graphics. They allow you to easily import, resize, and crop your files on the go.
Final thought
Learning how to build custom assets on your iPad is incredibly rewarding. It bridges the gap between creative expression and everyday organization, turning your digital planner into a truly personal canvas.
Don’t worry about making your first few illustrations look absolutely perfect. Focus on mastering the layer workflow and the outline trick first. Once you get the hang of the mechanics, the creative possibilities are completely endless.
Happy drawing, and enjoy customizing your digital world!