


Want to build your dream color scheme? Here is exactly how to create custom Procreate color palettes using simple methods that everyday artists rely on.
Every digital artist knows that feeling. You sit down with your iPad, Apple Pencil in hand, ready to sketch out an amazing idea, but you spend the next thirty minutes blindly scrolling through the color wheel trying to find the perfect shade of peach or a shadow color that doesn’t look like mud.
Having a signature color scheme makes your artwork look unified and professional. Choosing colors on the fly often breaks your creative flow.
If you want to speed up your workflow and elevate your digital art game, this guide will show you how to create custom Procreate color palettes using methods that everyday artists rely on. We will cover everything from manual swatches to automated photo-dripping techniques.
CONTENTS:
How to create custom Procreate color palettes
Procreate gives you a few different ways to build your dream color scheme. Whether you like to carefully curate each shade using digital color theory or grab inspiration from a photograph you took on your phone, here is the exact step-by-step process.
Method 1: Building a palette from scratch
If you already know exactly what colors you want, building a blank slate and filling it manually is the best way to go.
-
Open the Color Panel: Tap the active color circle in the top right corner of your Procreate workspace.
-
Navigate to Palettes: Tap the Palettes tab at the very bottom right of the drop-down menu.
-
Create a New Palette: Tap the + (plus) icon at the top right of the Palettes menu and select Create new palette.
-
Name Your Creation: Tap where it says “Untitled” and type in a name that makes sense for your project (e.g., “Retro Sunset” or “Moody Portraits”).
-
Add Your Swatches: Go back to the Disc or Classic color picker view. Find the shade you want, tap back into your new palette, and tap any empty square space to save that color.

Method 2: Extracting colors from a photo
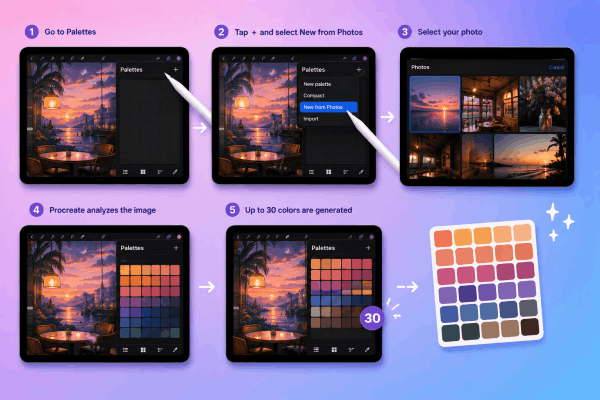
Have a beautiful sunset photo or a picture of an aesthetic cafe interior? You can turn those exact real-world colors into digital paint instantly.
-
Go back to the Palettes tab and tap the + icon.
-
Select New from Photos.
-
Browse your iPad’s camera roll and select your image.
Procreate will instantly analyze the image, pull out the dominant tones, and generate a perfectly organized grid of up to 30 swatches.
Method 3: Importing from files or Adobe Swatches
If you find a .swatches file online or want to bring in an Adobe ASE palette, the process is incredibly smooth. Simply open the Palettes menu, tap +, choose New from File, and navigate to where you saved the file on your iCloud or iPad storage.

Pro tips for choosing cohesive colors
Knowing the technical steps is only half the battle. The real magic happens when you know which colors to put together. Experienced digital painters use these practical strategies to build color harmony.
Use the Harmony tool for instant math-backed schemes
If you struggle to find colors that match, let Procreate do the math for you. In the color dropdown, tap the Harmony tab.
You can set the criteria at the top to modes like Complementary (colors opposite each other) or Analogous (colors next to each other). Move the primary selector, and the secondary nodes will automatically snap to colors that are visually guaranteed to look great together.
Pick your shadows and highlights first
A common mistake is picking out ten different bright colors and realizing your painting looks flat because everything has the same brightness level.
Limit your palette to create focus
Don’t feel pressured to fill all 30 slots in a Procreate palette. Many professional illustrators stick to a strict limit of 4 to 6 colors per piece. Using a limited color palette forces you to rely on contrast and value rather than chaotic color variety, making your art immediately look more clean and deliberate.
Read More:
- How to Create Digital Stickers on Procreate: A Complete Beginner Guide
- Procreate Canvas Size Too Small Error: Fix Your Layer Limits Now
Frequently asked questions about Procreate palettes
How do I delete a color swatch I don’t want?
If you accidentally added the wrong shade to your custom grid, simply tap and hold the specific square swatch. A small pop-up menu will appear, tap Delete to clear it out.
How do I make a specific palette my default layout?
Inside the Palettes tab, look at the right-hand side of your custom palette’s name bar. Tap the three dots ... and select Set as Default. Now, whenever you open the compact color window or use the quick-picker tool, this specific set of colors will stay visible at the bottom of the screen.
Can I share my custom Procreate palettes with friends?
Yes! In the Palettes tab, swipe left on the name of the palette you want to send. Tap the Share button, and your iPad will generate a .swatches file that you can AirDrop, email, or save directly to your files.

Final thought
Learning how to create custom Procreate color palettes is one of the easiest ways to streamline your art process and establish your unique style as a digital creator.
Instead of getting lost in millions of potential colors every time you want to paint, take a few minutes before each project to organize your swatches. Your eyes, and your creative workflow, will thank you.